#! /bin/bash

files=(*.txt)

for ((i=0; i<${#files[@]}; i++)) ; do
    file="${files[$i]}"
    awk -f f.awk "$file" > "${file}.mod"
done

 f.awk is:
{
    gsub(/\([^)]*\)/,"&; printf&")
    print
}

input.txt:

x=7;
sqrt(x+5*4); sqrt(x*x);
i=3;
a=2+sqrt(8);

Running: awk -f f.awk input.txt gives:
x=7;
sqrt(x+5*4); printf(x+5*4); sqrt(x*x); printf(x*x);
i=3;
a=2+sqrt(8); printf(8);

This wont work for nested parenthesis, like sqrt(4+2*(x+y))
Running: awk -f f.awk input.txt>>output.txt writes it to output file
Dec 6, 2013
Fusion code
Dec 5, 2013
Paraview Client Server model
We can't use the binaries for this model. Paraview has to be compiled on the server.
Following should be installed along.
1. cmake : cross platform build tool. CMake is used to control the software compilation process using simple platform and compiler independent configuration files. CMake generates native makefiles and workspaces that can be used in the compiler environment
2. Qt
http://qt-project.org/downloads
QT installation..
Goto INSTALL file in the downloaded unzipped tar file.
Look at the html for embedded Linux
http://qt-project.org/doc/qt-4.8/qt-embedded-install.html
now set the path in (your home directory) ~/.bash_profile
ParaView uses Qt as its GUI library. Qt is required whenever the ParaView client is built.
set qt path>>
export PATH=/home/umunipala/research/sem4/source/qt/qt-everywhere-opensource-src-4.8.5/bin:$PATH
file and source:: give the executables
export QT_QMAKE_EXECUTABLE=/home/umunipala/research/sem4/source/qt/qt-everywhere-opensource-src-4.8.5
Need to set this as environment variable
and run paraview : try qt installation and then set env variables. Then try the following...
/home/umunipala/research/sem4/source/ParaView-v4.0.1-source/CMake is the location to run this command
-----------------------------------------------------------------------------------------------------------------------------------------------------
3.MPI
4.Python
5 Mesa 3d graphics library
http://www.mesa3d.org/download.html
ftp://ftp.freedesktop.org/pub/mesa/9.0.1/
Cmake
There doesn't seem to be a 64 bit. Going to use Linux i386
http://www.cmake.org/cmake/resources/software.html
Installation location : /home/umunipala/research/sem4/source/cmake (binaries)
Source installation location:
/home/umunipala/research/sem4/source/cmake/cmakesource/cmake-2.8.12.1
-- Install configuration: ""
CMake Error at cmake_install.cmake:36 (FILE):
file cannot create directory: /usr/local/doc/cmake-2.8. Maybe need
administrative privileges. :(
Lets try the binary.
Maybe we need to add the bin to the path.
configuration of client with server:
https://www.alcf.anl.gov/user-guides/vis-paraview-data-analytics-cluster
Following should be installed along.
1. cmake : cross platform build tool. CMake is used to control the software compilation process using simple platform and compiler independent configuration files. CMake generates native makefiles and workspaces that can be used in the compiler environment
2. Qt
http://qt-project.org/downloads
QT installation..
Goto INSTALL file in the downloaded unzipped tar file.
Look at the html for embedded Linux
http://qt-project.org/doc/qt-4.8/qt-embedded-install.html
cd  ~/qt-everywhere-opensource-src-4.8.5
 ./configure -embedded
make
now set the path in (your home directory) ~/.bash_profile
PATH=/usr/local/Trolltech/QtEmbedded-4.8.5/bin:$PATH
 export PATH
also set cmake path
ParaView uses Qt as its GUI library. Qt is required whenever the ParaView client is built.
set qt path>>
export PATH=/home/umunipala/research/sem4/source/qt/qt-everywhere-opensource-src-4.8.5/bin:$PATH
file and source:: give the executables
export QT_QMAKE_EXECUTABLE=/home/umunipala/research/sem4/source/qt/qt-everywhere-opensource-src-4.8.5
Need to set this as environment variable
and run paraview : try qt installation and then set env variables. Then try the following...
/home/umunipala/research/sem4/source/ParaView-v4.0.1-source/CMake is the location to run this command
- Run ccmake to configure the Makefiles
%
ccmake ../ParaView-v4.0.1-source
-----------------------------------------------------------------------------------------------------------------------------------------------------
3.MPI
4.Python
5 Mesa 3d graphics library
http://www.mesa3d.org/download.html
ftp://ftp.freedesktop.org/pub/mesa/9.0.1/
Cmake
There doesn't seem to be a 64 bit. Going to use Linux i386
http://www.cmake.org/cmake/resources/software.html
Installation location : /home/umunipala/research/sem4/source/cmake (binaries)
Source installation location:
/home/umunipala/research/sem4/source/cmake/cmakesource/cmake-2.8.12.1
steps:
>> ./bootstrap
>> make
>>make install
CMake Error at cmake_install.cmake:36 (FILE):
file cannot create directory: /usr/local/doc/cmake-2.8. Maybe need
administrative privileges. :(
Lets try the binary.
Maybe we need to add the bin to the path.
export PATH=/home/umunipala/research/sem4/source/cmake/cmake-2.8.12.1-Linux-i386/bin:$PATH
configuration of client with server:
https://www.alcf.anl.gov/user-guides/vis-paraview-data-analytics-cluster
Dec 3, 2013
How to reset lost password in Ubuntu / Linux
Power on your Ubuntu computer while holding down the Shift Key on your keyboard. At the boot menu (GRUB) select (Recovery Mode)
Then scroll down to root and press Enter.


Then scroll down to root and press Enter.
Next, run the commands below to remount root

run the commands below to create / change your password.

Exit and login with your new password
Nov 8, 2013
Paraview
How to install and run Paraview on Linux
How to build Paraview on Linux
- Download the latest release from the Paraview website. The file is paraview-2.2.1-x86-linux.tar.gz
- Untar the file into some directory:
- Create a build directory:
- Run ccmake to configure the Makefiles:
- Here are the ccmake options that need to be set:
- Make the distribution:
% make
% make install
% tar zxvf paraview-2.2.1-x86-linux.tar.gz
% mkdir build
% cd build
% ccmake ../paraview-2.2.1
| CMAKE_INSTALL_PREFIX | /projects/vis/tools/paraview-2.2.1 |
| CMAKE_VERBOSE_MAKEFILE | ON |
| MPI_INCLUDE_PATH | /usr/local/apps/mpich-1.2.5.2/include |
| MPI_LIBRARY | /usr/local/apps/mpich-1.2.5.2/lib/libpmpich.a |
| OPENGL_INCLUDE_DIR | /projects/vis/tools/mesa-6.4.1/include |
| OPENGL_gl_LIBRARY | /projects/vis/tools/mesa-6.4.1/lib/libmGL.a |
| OPENGL_glu_LIBRARY | /projects/vis/tools/mesa-6.4.1/lib/libmGLU.a |
| OSMESA_INCLUDE_DIR | /projects/vis/tools/mesa-6.4.1/include |
| OSMESA_LIBRARY | /projects/vis/tools/mesa-6.4.1/lib/libmOSMesa.a |
| VTK_MPIRUN_EXE | /usr/local/apps/mpich-1.2.5.2/bin/mpirun |
| VTK_OPENGL_HAS_OSMESA | ON |
| VTK_USE_MPI | ON |
How to run Paraview on Linux
Stand-alone Client% ./paraviewClient to Server
% ./pvserver
% ./pvclient --server-host=machine.sdsc.eduClient to parallel Server
% mpirun -v -machinefile machines.txt -np 4 pvserver --use-offscreen-rendering(machines.txt contains a list of server machines)
% ./pvclient --server-host=machine.sdsc.edu
How to run the Paraview server on DataStar
Start pvserver on DataStar:% ssh dsdirect.sdsc.edu
% cd /usr/local/apps32/paraview-2.2.1/bin
% ./pvserver.sh
Start pvclient on another machine:
% ./pvclient --server-host=dsdirect.sdsc.edu --server-port=12345
How to load raw binary volume data into Paraview
- Select the File -> Open Data menu item.
- Select "Files of type: All Files (*.*)" and the raw volume.
- You will get a message: "Could not find an appropriate reader for file". Click OK.
- Select the "Raw (binary) Files Reader".
- In the "Parameters" tab, specify the following fields:
- Data type: byte, short, int, float, etc.
- Extent: [ 0 ][X-1][ 0 ][Y-1][ 0 ][Z-1]
- Press the [Accept] button
For example, if the volume resolution is 750 x 375 x 100, then set:
Extent: [ 0 ][749][ 0 ][374][ 0 ][ 99]
Client server model
It seems that Paraview can be run on the server and your computer can be a client if both has Paraview installed, regardless of the os.
http://visservices.sdsc.edu/threads/paraview/paraview.html
The best way to forward X applications to your local machine is by using your ssh server. This requires a small amount of setup with the ssh server. You must make sure the line: X11Forwarding yes is present in your sshd_config file. (/etc/ssh/sshd_config)
Once your ssh server has been configured, forwarding X applications is as simple as sshing in to the machine. The ssh server and client take care of all the forwarding details such as your environment varible and display number. There is a small catch: you must use the -X parameter to notify the client and server that you want X applications forwarded:

How to enable x-forwarding on server
Approach 1(Since I don't have admin rights I couldnt create the file) http://cosi.clarkson.edu/knowledge/faq/xforwarding.htmlThe best way to forward X applications to your local machine is by using your ssh server. This requires a small amount of setup with the ssh server. You must make sure the line: X11Forwarding yes is present in your sshd_config file. (/etc/ssh/sshd_config)
Once your ssh server has been configured, forwarding X applications is as simple as sshing in to the machine. The ssh server and client take care of all the forwarding details such as your environment varible and display number. There is a small catch: you must use the -X parameter to notify the client and server that you want X applications forwarded:
[evanchsa@somehost]$ ssh -X evanchsa@remotehost.clarkson.edu
Approach 2(worked): Using Xming and Putty (install Xming and putty)
Configure Putty as given below
Run Xming then start putty and log on to the server.
set path for paraview in server (centos)
Running Paraview after setting path is all there to do after the configuration. (http://visservices.sdsc.edu/threads/paraview/paraview.html)
export PATH=/home/umunipala/research/sem4/ParaView-4.0.1-Linux-64bit/bin:$PATH
Run Paraview
How to configure Putty (http://www.math.umn.edu/systems_guide/putty_xwin32.html)
Prerequisites
Configuring Putty
- Add Unix hostname
- Switch Protocol to SSH
- Type name of session in saved sessions
- Click 'Save'
- Expand the 'SSH' tab from the 'Category' list
- Choose 'X11' from 'SSH' list
- Check 'Enable X11 Forwarding'
- Choose 'Session' from 'Category' list
- Click 'Save'


Starting the X Server on Windows
Configuring Xming
Just run "All Programs > Xming Xming" and it should work if you've got PuTTY configured.Connecting
- Start Xming
- Start Putty
- Double click on the saved session you want
- Enter username and password as requested
- You should now be able to run X applications from the host
on your local desktop

William S. Bear
v1.1
Feb 27, 2006
Edited:
Aaron E. Fesperman
v1.2
July 30, 2012
Sep 24, 2013
Aug 16, 2013
Aug 15, 2013
Aug 9, 2013
SVN for Linux Centos os :CollabNet
—RapidSVN is a tortoisesvn like client program
that is available in
Ubuntu Software Center—Mac : svnx
—Centos/ Redhat (griffin) : collab.net client
◦$ yum install subversion◦ $ yum install
mod_dav_svn
Jul 31, 2013
Silk Subversion client for Windows
This is a tutorial on easy steps to use the Silk subversion client for windows using the online tutorial.
There are two clients you can download, commandline or the graphical tortoisesvn client.
I downloaded the graphical client. Install the subversion in any location of your choice.
Get the help manual from here or html version.
There are two clients you can download, commandline or the graphical tortoisesvn client.
I downloaded the graphical client. Install the subversion in any location of your choice.
Get the help manual from here or html version.
Jul 24, 2013
Setting up SSH keys in the cluster
[umunipala@griffin ~]$ ssh-keygen -t rsa -C "rsa key generated july 24"
Generating public/private rsa key pair.
Enter file in which to save the key (/home/umunipala/.ssh/id_rsa):
Enter passphrase (empty for no passphrase):
Enter same passphrase again:
Your identification has been saved in /home/umunipala/.ssh/id_rsa.
Your public key has been saved in /home/umunipala/.ssh/id_rsa.pub.
The key fingerprint is:
e3:96:48:63:7c:38:79:c6:3c:02:bb:e3:9c:1b:39:49 rsa key generated july 24
The key's randomart image is:
+--[ RSA 2048]----+
| |
| |
| . |
| + = |
| E X S |
| . * X + |
| B . + |
| o = . |
| =. |
+-----------------+
[umunipala@griffin ~]$
[umunipala@griffin ~]$ cd /home/umunipala/.ssh/
[umunipala@griffin .ssh]$ ls
authorized_keys id_dsa id_dsa.pub id_rsa id_rsa.pub known_hosts
Shortnotes on Gamess Installation
Gamess Installation
Run the config script in /home/umunipala/research/gamess/games/gamess
Run the config script in /home/umunipala/research/gamess/games/gamess
After configuring goto
/home/umunipala/research/gamess/games/gamess/ddi
Run compdd script which generates the .x files
Create a temporary memory location /home/umunipala/research/gamess/games/gamess/ddi/temp
Run the ddi_test.x file
./ddikick.x /home/umunipala/research/gamess/games/gamess/ddi/ddi_test.x /home/umunipala/research/gamess/games/gamess/gamess.13.x gamess.13.x -ddi 1 1 griffin -scr /home/umunipala/research/gamess/games/gamess/ddi/temp
-------------------------------------------------------------------------------------------------------
Running from NetBeans
Highlight the project and goto Run window -> set project configuration-> customize
Give
./ddikick.x /home/umunipala/research/gamess/games/gamess/ddi/ddi_test.x /home/umunipala/research/gamess/games/gamess/gamess.13.x gamess.13.x -ddi 1 1 griffin -scr /home/umunipala/research/gamess/games/gamess/ddi/temp

---------------------------------------------------------------------------------------------------------
ddi configuration in ssh
Changed the write permission in scratch memory
/home/umunipala/research/gamess/games/gamess/ddi/temp
(I gave all rwx permissions) >> chmod 777 /home/umunipala/research/gamess/games/gamess/ddi/temp
Then run in 2 nodes in the cluster (after setting ssh & mpi)
>> /home/umunipala/research/gamess/games/gamess/ddi/ddikick.x /home/umunipala/research/gamess/games/gamess/ddi/ddi_test.x /home/umunipala/research/gamess/games/gamess/gamess.13.x gamess.13.x -ddi 2 4 172.16.0.1:cpus=2 172.16.0.1:cpus=2 -scr home/umunipala/research/gamess/games/gamess/ddi/temp
Jul 22, 2013
Creating a remote project in Netbeans
New project options wont work when you have to create a remote project. Easiest way is to click this icon and select your project or create new one.


Jun 8, 2013
Jun 7, 2013
Netbeans for running parallel c/c++ projects
Help>>
http://forums.netbeans.org/ptopic48696.html
1. Lanch IDE with the following parameters:
-J-Dnativeexecution.support.logger.level=100
-J-Dcnd.remote.logger.level=100
2. Set -j3 in Make options (Tools -> Options -> C/C++ -> Project
Options -> Make Options)
3. Create Quote sample (New Project -> Samples -> Quote) and Clean and
Build it.
4. Go to IDE Log (View -> IDE Log) and check make's parameters ->
the -j3 will be where.
5. Setup some remote host and change build for Quote to that
host (Project Properties -> Build -> Build Host).
6. Clean and Build Quote once more and check the IDE Log -> the -j3
will be where again.
[netbeans 7.2]
https://netbeans.org/projects/cnd/lists/users/archive/2009-03/message/179
This is for running openmp for c++

Still we are using gcc. Next step is to change the compilers from c/c++ to mpicc/mpic++, some people seems to have successfully gotten there.
I'm thinking if I add mpicc as another tool collection in the host it would work..
Following is the current settings in the properties of the new toolchain I added. We can compile with mpicc now.


http://forums.netbeans.org/ptopic48696.html
1. Lanch IDE with the following parameters:
-J-Dnativeexecution.support.logger.level=100
-J-Dcnd.remote.logger.level=100
2. Set -j3 in Make options (Tools -> Options -> C/C++ -> Project
Options -> Make Options)
3. Create Quote sample (New Project -> Samples -> Quote) and Clean and
Build it.
4. Go to IDE Log (View -> IDE Log) and check make's parameters ->
the -j3 will be where.
5. Setup some remote host and change build for Quote to that
host (Project Properties -> Build -> Build Host).
6. Clean and Build Quote once more and check the IDE Log -> the -j3
will be where again.
[netbeans 7.2]
https://netbeans.org/projects/cnd/lists/users/archive/2009-03/message/179
This is for running openmp for c++
- mpic++ for some reason or other produces the wrong (???) command line;
- it typically looks like this:
- c++ -m32 -O2 -Wl,-z,noexecstack -I/usr/include/mpich2-i386 -L/usr/lib/mpich2/lib -L/usr/lib/mpich2/lib -lmpichcxx -lmpich -lopa -lpthread -lrt
- but it should look like this (highlighting changes from above only):
- c++ -fopenmp -m32 -O2 -Wl,-z,noexecstack -I/usr/include/mpich2-i386 -L/usr/lib/mpich2/lib -L/usr/lib/mpich2/lib -lmpichcxx -lmpich -lgomp -lpthread -lrt
- it typically looks like this:
- Therefore, in the properties of your NetBeans project, under C++ Compiler::Additional Options you set the command line to
- -fopenmp -m32 -O2 -Wl,-z,noexecstack -I/usr/include/mpich2-i386 -L/usr/lib/mpich2/lib -L/usr/lib/mpich2/lib -lmpichcxx -lmpich -lgomp -lpthread -lrt
- Alternatively you can of course use that as-is on the command line
- ..and compile…and it runs, and according to my perf monitor it uses more than one thread. Perfect.
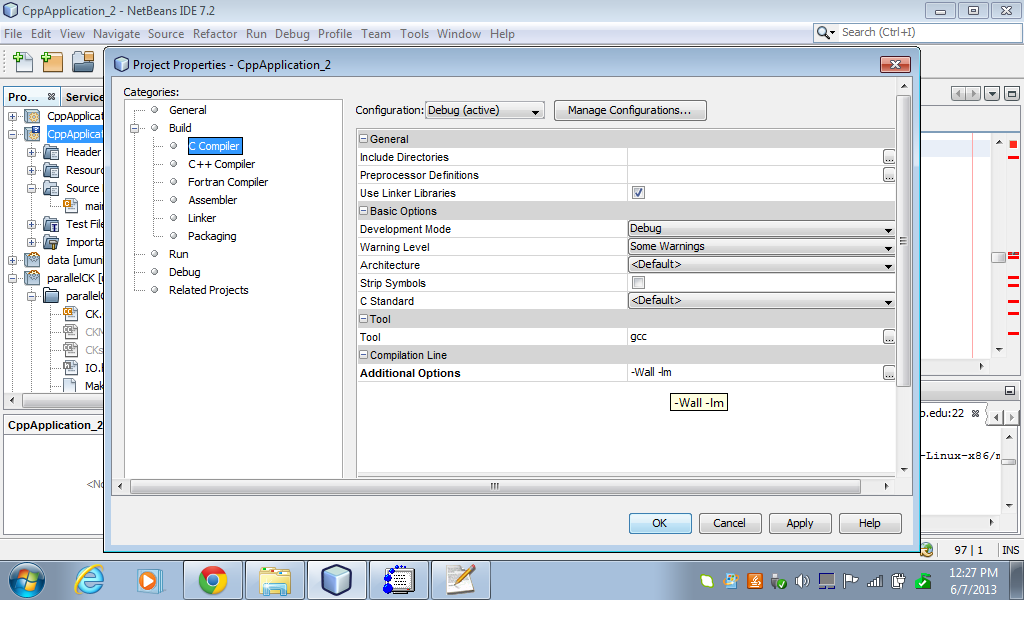
HOW TO ADD COMMANDS TO COMPILER
rightclick and goto project properties->select the compiler(here c) -> add the commands to Additional options.
I'm thinking if I add mpicc as another tool collection in the host it would work..
Following is the current settings in the properties of the new toolchain I added. We can compile with mpicc now.

I set the absolute srun (or mpirun) path in the same way and Ooola its running!!


netbeans remote configuratin
1. set up gnu tool chain (locate it from the server)

Download gnu toolchain (gcc, gmake etc..) if you already do not have on the server from http://gcc.gnu.org/
https://netbeans.org/kb/docs/cnd/remote-modes.html

...As easy as that!
Jun 4, 2013
LInux commands
>>chmod -R 755 . give world executable to all users for the current path
Download a link
>> wget http://archive.eclipse.org/tools/ptp/builds/2.1.0/I.I200811031726/rdt-server-linux-1.0.tar
Using wget with password and username
wget http://link --user=userName --password=passWord
How to unzip a file
>>ls -l check your permissions in current path
How to find bashrc
>>vi ~/.bashrc
How to figure out what kind of os
>>uname -a
How to find bashrc
>>vi ~/.bashrc
How to figure out what kind of os
>>uname -a
Download a link
>> wget http://archive.eclipse.org/tools/ptp/builds/2.1.0/I.I200811031726/rdt-server-linux-1.0.tar
Using wget with password and username
wget http://link --user=userName --password=passWord
How to unzip a file
- Type at the command prompt
- tar xvzf file-1.0.tar.gz - to uncompress a gzip tar file (.tgz or .tar.gz)
- tar xvjf file-1.0.tar.bz2 - to uncompress a bzip2 tar file (.tbz or .tar.bz2)
- tar xvf file-1.0.tar - to uncompressed tar file (.tar)
- x = eXtract, this indicated an extraction c = create to create )
- v = verbose (optional) the files with relative locations will be displayed.
- z = gzip-ped; j = bzip2-zipped
- f = from/to file ... (what is next after the f is the archive file)
- The files will be extracted in the current folder (most of the times in a folder with the name 'file-1.0').
When math.h etc is not linked with gcc compiler
>>gcc -Wall calc.c -o calc -lmHow to find a given linux kernal is 32 or 64 bits?
>> uname -m
It actually gives x86_64 indicating 64 bits.
How to change password
>>passwd
>>passwd
Jun 3, 2013
Eclipse PTP configuration on windows/linux
minimum requirements for PTP 6.0:
- Java 1.6 or later
- Eclipse 4.2 or later (Eclipse 3.8 should also work)
- C/C++ Developer Tools (CDT) 8.1 or later
- Remote System Explorer 3.4 or later is required for RDT (although does not need to be used)
Server-side pre-reqs:
- git (if Synchronized projects are used) - version 1.5 or later
- Java (if RDT remote projects are used)
- Perl (for System Monitoring)
- gdb (for Parallel Debugger)
http://www.macraigor.com/downloads/Macraigor_with_Eclipse.pdf
cross compiler version of gdb
You'll need need to compile a cross version of gdb. I'd use MinGW and MSYS, then pass this to configure: "--target=i686-linux-gnu --host=i686-pc-mingw32 " (assuming your server is i686).
ptp/rdt
-----------------------------------------------------------------------------------------------------
When you debug a remote application you have gdbserver running on the remote host, and GDB running on the local host. GDB needs to know about the debug symbols and therefore needs to know where your application is, on the local file system.
Another way to say this is that you need two binaries: one on the local host and one on the remote host.
May 31, 2013
Vi editor commands for Linux.
When you open Vi ,it starts in command mode; you have to pres 'ESC' key to goto insertion mode.
e.g: Open VI From linux shell
>> vi yourfilename
>> {press ESC then : i} Now you can edit (no spaces between : and i)
>>
Following are the basic commands you need to work with the editor. Assuming that you are in the editor,
>> {press ESC then : x} exit saving changes
>> {press ESC then : q} exit if there are no changes
>> {press ESC then : q!} exit without saving the changes you made
>> {press ESC then : 20}move the curser to the 20 th line.
>> {press ESC then : d} delete the current line
There were some additional commands that might come in handy here
Subscribe to:
Posts (Atom)